Kaen-Coon AI Cluster by College of Computing, Khon Kaen University
Kaen-Coon AI Cluster is a high-performance computing platform (HPC), powered by Slurm and LiCO software, providing excellent resources for large-scale research and artificial intelligence workload. The documentation purpose is to serve a tutorial and a brief guide on using Kaen-Coon AI Cluster for both users and administrators.
Registration can be found here.
Eligibility
- College of Computing student: available only with project proposal approved by the advisor at no costs.
- College of Computing researchers and lecturers: available with no costs.
- Students within Khon Kaen University: available with project proposal approved by the advisor and hourly fees.
- People outside Khon Kaen University: Not currently available. To be announced.
Contribution
Please refer to this page
Glossary
- CUDA
- Compute Unified Device Architecture. A computing platform specialized on parallel computation, which existed in NVIDIA GPU. Must interact via CUDA driver and CUDA framework in C++ (which includes Python).
- H100
- One of NVIDIA’s industrial GPU (Blackwell generation) lineups.1
- MIG
- A partitioning system for NVIDIA GPU, allowing multiple instances running simultaneously on one GPU with on-premise performance. 2
- Slurm
- A workload management and jobs scheduling system for multiple computing nodes.
- LiCO
- Web-based software developed by Lenovo. It provides Slurm interaction points via web interface, unlike usual Slurm interaction via command lines.
Slurm Glossaries
- Job
- A unit of workload for Slurm to process; usually expressed in a shell script.
- Node
- One single unit of computer within a cluster.
- Cluster
- A group of computing nodes.
- Container
- Operation-system-level virtualization with isolation from others processes. In Slurm, it is another way of getting any packages within the job environment.
- Partition
- A grouping of nodes. Each partition may have different specifications.
- Queue
- A waiting line for jobs. Some queues may have priorities (preemptive jobs) or access to specific partition of the cluster.
- Wall Time
- The maximum period of time allowed for a job to run. If the job is still
running when running time exceeds the wall time, Slurm will stop the job
immediately with
SIGTERM.
Additional Slurm terminologies/concepts can be found here.
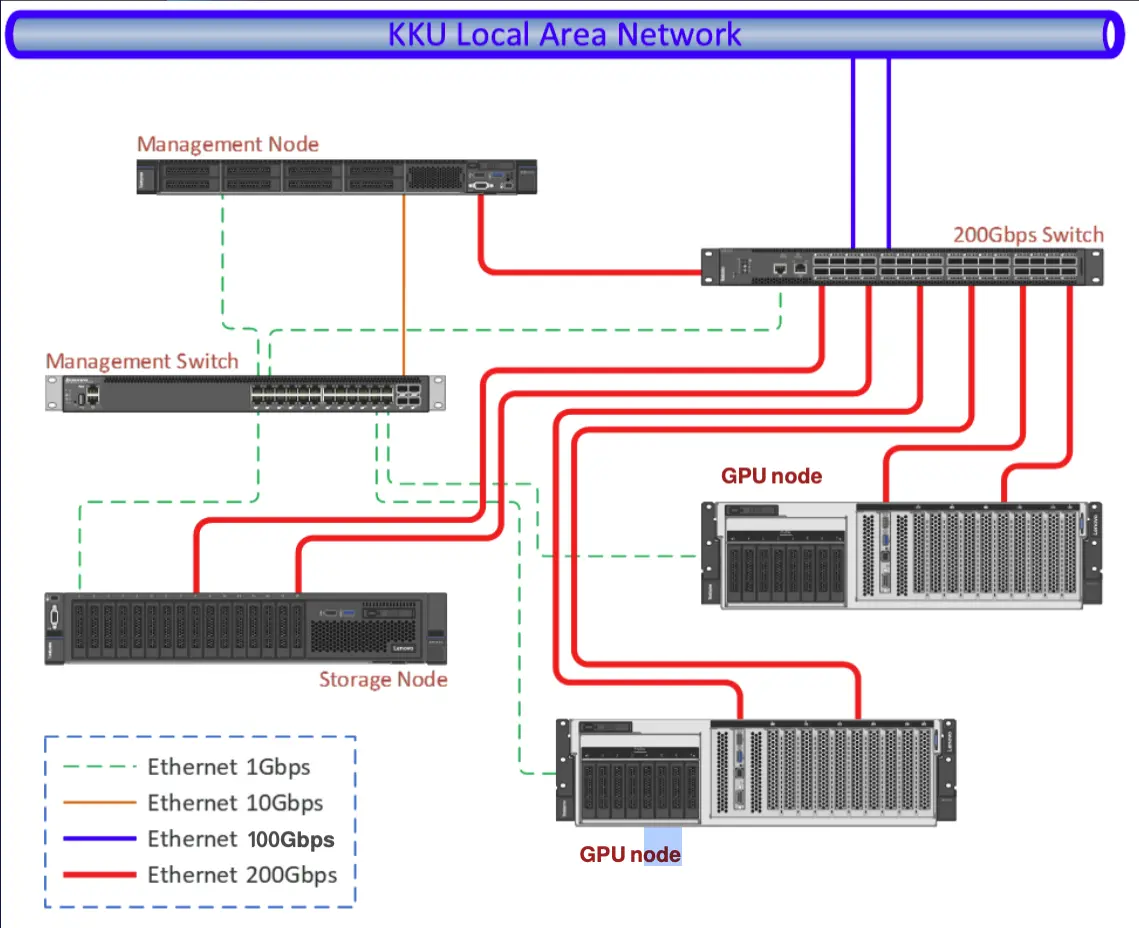
System Architecture
lico: login nodecn1: computing node- 2x AMD EPYC 9224: 24 Core 2.5 GHz
- 16x 64 GB memory
- 2x 960GB M.2 NVMe SSD + 1x 15.36TB NVMe SSD
- 4x NVIDIA H100 80GB HBM3
- 1 Full 80GB
- 3 (7x 10GB MIGs)
cn2: computing node- 2x AMD EPYC 9224: 24 Core 2.5 GHz
- 16x 64 GB memory
- 2x 960GB M.2 NVMe SSD + 1x 15.36TB NVMe SSD
- 4x NVIDIA H100 80GB HBM3
- 4 Full 80GB
For Users
To interact with the cluster, go to https://10.198.253.15:8000. All operations will happen on the website via web interface.
Note
Currently, the cluster portal is operated with a self-signed certificate. The browser might see the website as a potential threat. However, it is safe to proceed.
Note
Make sure that you already obtained username/password for the cluster. Registration can be found here.
Before running a program, we must upload scripts and data to the cluster first. When we start running programs, we have something to run and calculate.
Then, we can creating/submitting a job completing desired workload.
However, when the job needs specific environments, we can create containers and operate under containers allowing the script to use custom programs.
Files Operations
LiCO allows access to the tree view of file directories, making it easy for file operations on web interface.
- Click
 button on the upper right navigation bar.
 - If the file tree does not appear, click
 on the lower left side.
 - The file tree should appear on the left side.
Creating/Uploading files
Click on ![]() to either create a
directory or a file on that path.
to either create a
directory or a file on that path.
We can drag and drop files/directories from your computer to the file tree window as well. The file(s) will automatically transfer from your computer to the cluster.
Editing files
- Right-click on the file inside the file tree.
- Select “Edit”.
- The web will show a buffer window. Edit it.
- Click “Save” to save the change.
Tip
It is more convenient to edit the file(s) in your computer with your desired IDE and later overwrite the file(s) on the cluster by uploading.
Deleting files
- Select the file(s) to be deleted from the file tree.
- Click
 button.
 - Confirm deletion.
Advanced
Since the cluster is based on Slurm, files can be transferred directly via scp
or rsync programs as another remote server.
scp -r your/project/directory your_username@10.198.253.15:~/your/working/directory
rsync -avPh your/project/directory your_username@10.198.253.15:~/your/working/directory
Interactive files editing on the cluster can also be done with ssh with given
credentials.
Submitting a Job
Create a Job
Before creating a job, you may want to transfer some script(s) and dataset to the cluster.
- Go to the menu item “Job Templates” on the left side.
- Select a suitable template for your job (Common Job). Here are some details
for frequently-used templates:
- Common Job: cover most of the need of running bare scripts.
- Singularity: be able to run jobs with custom containers.
- PyTorch: expose PyTorch library for the job to use.
- Fill up the job detail:
- Template Information:
- Job Name: the job name. Must be alphanumeric including underscore.
- Workspace: the directory that the job will start. Log files will be also generated here.
- Resource Options:
- Queue: choose your allowed queue.
- Exclusive: whether to disallow other jobs running on the same node. Keep the box empty.
- Node: the number of computers to run the job; usually
1. - CPU Cores Per Node: the number of CPU cores per computer to run. Must be under the limit.
- GPU per Node: either
0or1.- GPU Per Node: the number of GPU per computer to run; usually
1. - GPU Resource Type:
gpu:STU_GPUif you are a student (MIG).gpu:Full_GPUif you are lecturer/researcher.
- GPU Per Node: the number of GPU per computer to run; usually
- Memory Used: the memory per job in
MB. Must be under the limit. - Wall Time: the maximum duration the job allowed to run. Must be under the limit.
- Template Information:
- Click “Submit” to create the job and submit it to the cluster.
Monitor a Job
After submitting a job, the job will go through a queue and being run by a node.
Most of monitoring will be in the page of the menu item “Job Monitoring” on the left side. After entering, there will be 3 sections.

- Running: jobs currently being run by nodes will be shown here.
- Waiting: jobs being held in a queue.
- Completed: history of jobs already run.
Tip
To inspect why your job is currently queueing, go to “Waiting” tab, click on the waiting job’s scheduler ID, and inspect on the value of
Reasonvariable. In normal circumstances, the value should benormal.
Assuming the job is out of queue and running, you can monitor it by:
- Click “Running” tab. There will be your jobs that are running (if already passed the queue).
- Click on the job name to see further details of the running job. There
will be tabs on each aspect of the detail.
- Log: shows all
stdoutfrom the running job. Useful for tracking the current state of the job. - Resource: all resource used for running the job.
- Log: shows all
After the job has finished running:
- Click “Completed” tab. You will see the history of completed jobs
- Click on the job name to see further details of that job.
- Click “Log” tab to show completed
stdoutfrom that job.
Copy a Job
In case you want to rerun the job or modify a few job details, you can quickly copy the detail reference from the previous job, so you do not have to recreate a new job from scratch again.
- Go to either “Running”, “Waiting”, or “Completed” tab; the one that has the job.
- Click “Action” button on the right side of the job you intend to copy.
- Click “Copy”, this will recreate another job with filled details.
- Edit the detail, and then click “Submit” to send a new job.
Creating a Container
To be added.
Limitations
Here are current resource limitations for each user roles.
| Resource | Student | Researcher/Lecturer |
|---|---|---|
| CPU/Job | 3 cores | 16 cores |
| Memory/Job | TBD | 36 GiB |
| Wall Time | 3 Hours | 5 Days |
| GPU/Job | 1 MIG | 1 Full Card |
Important
Make sure that your job’s resource requests do not exceed the given limitation. The job might be stuck forever in
Queueingif the requested resource exceed the limitation of your quotas.
Frequent Problems
Why does my submitted job appear to stuck in the queue forever?
One way to diagnose the problem is to click on the Scheduler ID and look at
the scheduler’s description. If the Reason variable equals to:
QOSMaxWallDurationPerJobLimit: Your job requested wall time for too long and will stick in the queue forever. Please cancel the current job, copy the job, and adjust the wall time to be under your role’s limitations.
Why my job cannot use existing GPU?
Especially for students groups, only MIG GPUs are allowed. By default, your
script is not usually specified to use MIG GPUs for computation, but full GPUs.
As the job is only allocated for MIG GPUs, requesting a full GPU inside might be
problematic. To make your job use MIG GPUs, some environmental declarations are
needed. In this case, we specify “CUDA devices” to be a MIG GPU via declaring
CUDA_VISIBLE_DEVICES environment variable as a MIG GPU ID. You can copy this
line of the script before the execution line of the program.
export CUDA_VISIBLE_DEVICES=$(
    nvidia-smi -L | \
        grep -Eo 'MIG-[0-9a-f]{8}(-[0-9a-f]{4}){3}-[0-9a-f]{12}' | \
        head -n 1
)
The script basically lists all available GPUs with UUID. Then, we grab the first MIG GPU ID (the one Slurm allocates for us), and declaring it the CUDA device to be used.
For Administrator
To be added.
Reference
Contribute
The whole documentation is written in markdown files at https://github.com/anonymaew/kaen-coon-doc.
If you find a page missing some information and need some edits, you can edit the page by clicking the pencil icon in the top right corner. This will fork the repo, allowing you to edit the documentation. Then, please submit a pull request as well.
You are also welcomed to leave comments and suggestions without writing the documentation by creating new issue.
Workflow
- Documentation platform:
mdbook - Written in Markdown on
srcdirectory. - i18n:
mdbook-i18n-helpers